On my macbookpro12,1, Time Machine could no longer do backups and I wanted to start a new archive. I didn’t want to lose my previously backed up files nor did I want to start a new backup from scratch as it takes several hours. To repair the existing backup stored on our Time Capsule, I tried using instructions on this
guy’s blog.
Sadly, fsck_hfs couldn’t repair my .backupbundle/sparsebundle, so I had to start over anyway! This has happened to me and others a few times in the past, so maybe the instructions above will be useful later. Better yet, copying and pasting the commands above gets old, so I may try the shell script here:
https://gist.github.com/ahknight/dec202583a910756c6d9
It also
might help to add “fsck_hfs” to your full disk allowed list in System Preferences->Security->Privacy->Full Disk Access.
Finally, others have asked me about scheduling Time Machine backups. I may give
these instructions a shot at some point, as it may relieve the issues that caused me to write this post.
** UPDATE 7-8-2020 **
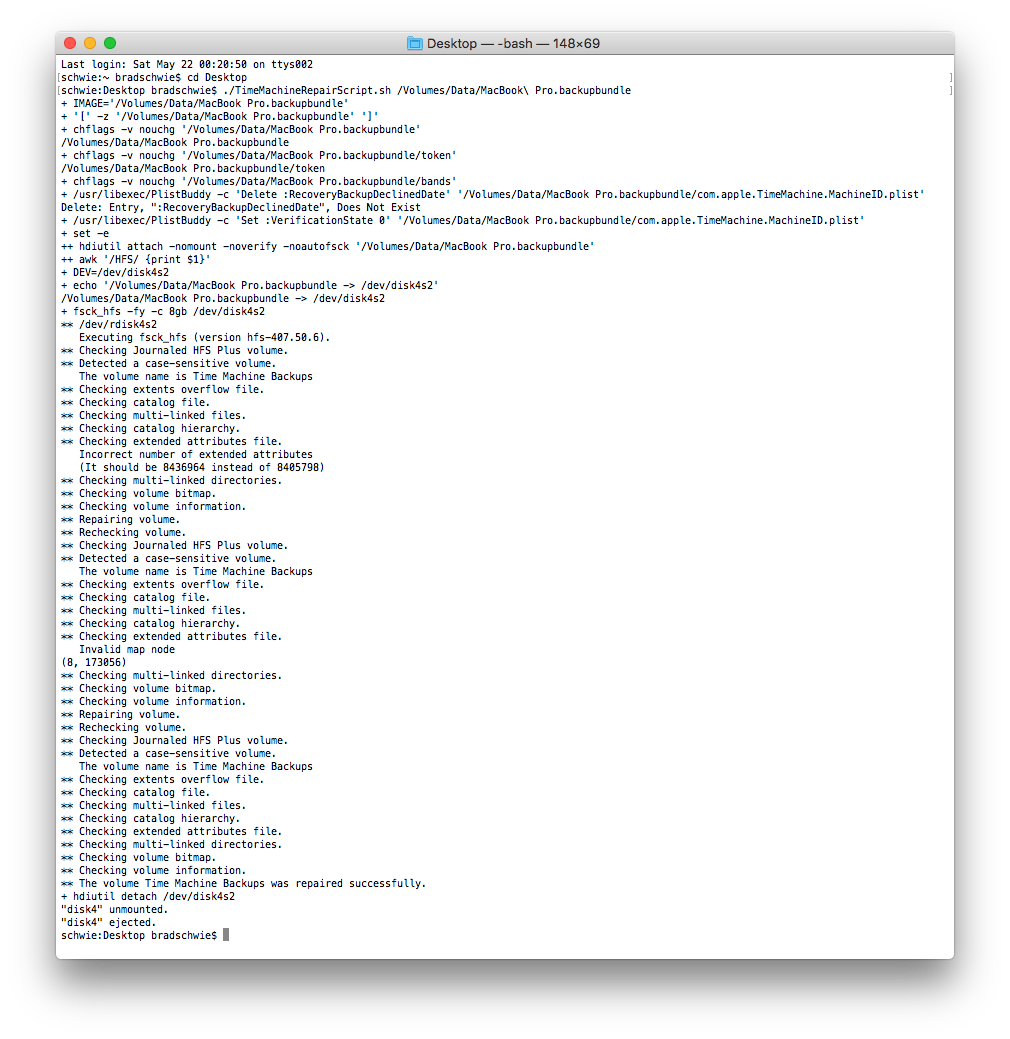
This issue came up again with the backups created by my MacBook Pro today. Instead of running all the steps and advice above, I turned to this shell script, which I perused on another site (sorry, I’d love to credit the author, but I can’t seem to find them). I store this script on another machine on my network that has access to the Time Capsul so it can do the dirty work as it seems to run for a while. Here are the updated steps:
0. Disable Time Machine on your Mac, in my case from my MacBook Pro -> go to System Preferences…->Time Machine->uncheck box for “Back Up Automatically”.
1. Open a Terminal window and navigate to the directory where you saved the .sh script referenced above, in my case the desktop:
schwie:~ bradschwie$ cd Desktop
schwie:~ bradschwie$ chmod +x TimeMachineRepairScript.sh
schwie:~ bradschwie$ ./TimeMachineRepairScript.sh
(don’t press enter yet and leave this window open, we’ll be coming back to it in Step 4)
2. Connect to a server on my network (Mac mini) and connect to the Time Capsule’s disk: In a Finder window, look in the left hand pane under “Shared”, click the name of your Time Capsule, and then click “Connect As…”
3. When the Time Capsule’s disk mounts, click the “Data” folder, locate the name of your backup and drag its icon to the Terminal window in Step 1 and release.
4. Press return in the Terminal window.
5. After the script successfully completes repair of the backup, reenable Time Machine on your Mac.
@@ I can’t remember where I got the script linked above, but if you run it from the Mac where your Time Machine backups originate, you could enable and disable Time Machine using (steps 0 and 5) using information from these folks.
** UPDATE 7-19-2020 **
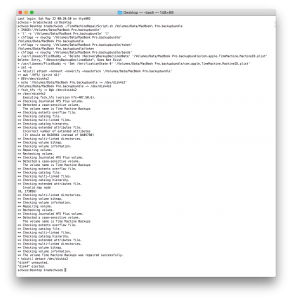
It happened again today and the script once again worked. Not sure why this keeps happening, except I think it may have to do with me putting the Mac to sleep while its in the middle of a backup. Maybe I should start restricting Time Machine to do its backups between 2am and 5am? Here’s the successful script output and my Time Machine is back in action:
schwie:Desktop bradschwie$ ./TimeMachineRepairScript.sh /Volumes/Data/MacBook\ Pro.backupbundle
+ IMAGE='/Volumes/Data/MacBook Pro.backupbundle'
+ '[' -z '/Volumes/Data/MacBook Pro.backupbundle' ']'
+ chflags -v nouchg '/Volumes/Data/MacBook Pro.backupbundle'
/Volumes/Data/MacBook Pro.backupbundle
+ chflags -v nouchg '/Volumes/Data/MacBook Pro.backupbundle/token'
/Volumes/Data/MacBook Pro.backupbundle/token
+ chflags -v nouchg '/Volumes/Data/MacBook Pro.backupbundle/bands'
+ /usr/libexec/PlistBuddy -c 'Delete :RecoveryBackupDeclinedDate' '/Volumes/Data/MacBook Pro.backupbundle/com.apple.TimeMachine.MachineID.plist'
+ /usr/libexec/PlistBuddy -c 'Set :VerificationState 0' '/Volumes/Data/MacBook Pro.backupbundle/com.apple.TimeMachine.MachineID.plist'
+ set -e
++ hdiutil attach -nomount -noverify -noautofsck '/Volumes/Data/MacBook Pro.backupbundle'
++ awk '/HFS/ {print $1}'
+ DEV=/dev/disk4s2
+ echo '/Volumes/Data/MacBook Pro.backupbundle -> /dev/disk4s2'
/Volumes/Data/MacBook Pro.backupbundle -> /dev/disk4s2
+ fsck_hfs -fy -c 8gb /dev/disk4s2
** /dev/rdisk4s2
   Executing fsck_hfs (version hfs-407.50.6).
** Checking Journaled HFS Plus volume.
** Detected a case-sensitive volume.
   The volume name is Time Machine Backups
** Checking extents overflow file.
** Checking catalog file.
** Checking multi-linked files.
** Checking catalog hierarchy.
** Checking extended attributes file.
** Checking multi-linked directories.
** Checking volume bitmap.
** Checking volume information.
** The volume Time Machine Backups appears to be OK.
+ hdiutil detach /dev/disk4s2
"disk4" unmounted.
"disk4" ejected.
** UPDATE 8-17-2020 **
So, it happened again today and the script once again worked. Not sure why this keeps happening, but after running the script and continuing backups with Time Machine, a long clean seems to occur.
** UPDATE 6-28-2021 **
Yesterday, I had to abort my MacBook Pro’s Time Machine backup 2/3’s of the way into it. After aborting, Time Machine told me it was having problems with Time Capsule, so I followed the instructions above and kicked off the script.
** UPDATE 6-30-2021 **
The script took two days to finish up while running on a machine connected via gigabit ethernet, here’s the successful output: