About Brad

All-around tough guy.

KitchenAid KSCS25FJSS01 and Whirlpool Every Drop Filter 5 (EDR5RXD1)

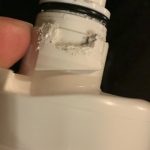
I bought a set of Whirlpool Every Drop Filter 5 cartridges for our KitchenAid KSCS25FJSS01 side-by-side refrigerator. 6 months ago, I noticed the first Filter 5 I installed in refrigerator was really hard to install. Upon removing it 6 months later, I looked at the threads and they were well worn from where I installed it:

It appears Every Drop made these threads too deep, so I used a file on the next filter I was about to install and removed some plastic as shown in this pic:

Boom, the filter installed effortlessly this time. I removed about half the plastic at the thread as seen in the closeup above. I’m going to follow up with Every Drop and Whirlpool, this is either a design issue or a manufacturing error that they probably already know about since I’m getting it to it at least 6 months after I purchased them.

** Update 5-2-2022 **
This morning I contacted Whirlpool at 800.442.9991. Brandon with support kindly forwarded me to Whirlpool’s “Water Filter Deparment” who then had a female representative review my KitchenAid model and cross-reference it with their filter offerings, eventually confirming the Every Drop Filter 5 is the correct option for my refrigerator.

I explained to her that I purchased a multi-pack of Filter 5’s from a local store and removed a filter I installed 6 months ago that required considerable effort and, upon removing it, I noticed damaged filter threading in the pictures above and how it was potentially damaging my refrigerator housing. I told her how I have since modified the threads and offered her pictures on my blog, but she said she had “no access”. She continued that she has no access to the supplier’s quality control for these filters since it is a separate company from Whirlpool, she offered to replace my filters for a discount, and she would “add a note to my file” about our exchange. I told her I didn’t care so much about a replacement filter or a note to my file as I wanted Whirlpool’s filter supplier to know that these filters are not being manufactured to specification and that they could be damaging housing on other people’s older refrigerators. I offered to send her an unopened filter for Whirlpool’s inspection to correct the matter. Prior to this I should have requested her name again, but she eventually hung up on me and was not interested in escalating the issue I was observing. Surely someone at Whirlpool cares, I may try other channels.

** Update 5-6-2022 @ 11:00 A.M. CDT **
This morning I spoke with Whirlpool’s support specialist, Diane. She informed that counterfeit products are sold by others. I purchased my filter from Amazon and a couple others from a local store; however, she said both of those channels are not authorized resellers. I’m a bit surprised, as my Amazon order says the seller is “Amazon.com Services LLC”, which most manufacturers allow – not Whirlpool.

So, if you want a guarantee with your Whirlpool/Every Day Filter 5, only buy it from Whirlpool. Since my filter has threading that is too large, Whirlpool is basically chalking this up as a counterfeit seller. I may take this up with Amazon, next.

** Update 5-6-2022 @ 11:30 A.M. CDT **
Whirlpool website list 30 authorized resellers around me and presumably includes Amazon if they are the authorized reseller. I call Whirlpool back and this time reached Toni, she’s looking into why Diane told me the information above.

Toni came back on the phone and said I will have to take this up with Amazon. I told her that’s fine, but when I take it up with Amazon, they tell me to take it up with Whirlpool.

I told Toni I’d push Amazon on it again. To do so, I asked her if she can send me the warranty that Whirlpool would offer on this filter if I had ordered it from them. She said she’d check with her supervisor and get back to me. I told her I want an email copy, whether it is 6 months or whatever, I want to see it in writing.

** Update 4-20-2023 @ 22:30 CDT **
The modified filter appeared to hold up fine until now, the orange filter light illuminated on the refrigerator. I had one more in my 2-pack, so I modified it similar to above only I rushed it more this time just grinding away most of the screw-in surface. After coming back downstairs, I noticed a dripping noise in my shop. I think my hack isn’t quite working and it allows too much slop in the filter when it’s screwed in or the female refrigerator housing is now cracked. To test this out, I ordered a new filter, a Culligan CUW5. I’m going to try and install the CUW5 without modifying it. If that fails to stop the leak, it’s easy enough to replace the refrigerator’s female housing. The female housing isn’t cheap, fortunately Dey stocks it locally for a premium.

AirPort Time Capsule 2nd Gen and Cisco WS-C2960S-24TS-S networkQuality test results

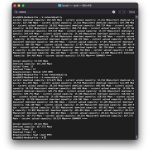
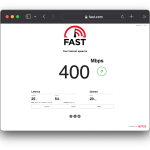
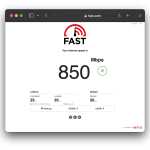
I perused Adam Engst’ TidBits article on using networkQuality through Terminal.app in Monterey. Just to memorialize what our network of AirPort Time Capsule and Express devices paired with a Cisco WS-C2960S-24TS-S musters up, I’ve saved test results below. The first test was run via WiFi and the second test was via ethernet (gigabit connection back to a Cisco managed switch that is connected to an AirPort Time Capsule):

WiFi test:

Ethernet test:

I’m impressed with these results. Sure WiFi could be faster, but I’m really impressed how the Apple and Cisco equipment holds its own several years after being discontinued and lacking features like SQM – I expected the loaded results to be an order of magnitude worse than what is reported above.

Updating syncthing and syncthing-macos

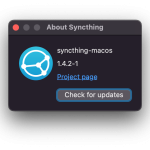
Years ago I installed syncthing with brew and I later added syncthing-macos to view it’s status graphically from the Mac’s menubar. I perused this site for some of the configuration. Updating syncthing-macos to the latest version is possible by going to the menubar, selecting the syncthing icon, choosing “About”, and then “Check for Updates”:

To update syncthing (the executable that syncthing-macos reads from) as a formula, execute the following brew commands in Terminal.app:

brew services stop syncthing
brew upgrade syncthing
brew services start syncthing

Completing the above commands moved my Mac’s syncthing from version 1.15.1 (Big Sur) to 1.19.2 (Monterey). Package managers are so slick.

** Update 6-16-2022 **
Still running Monterey and the procedure above worked well. You can keep syncthing-macos running, I just ran the Terminal commands and syncthing-macos’ menubar icon gains an exclamation point while this change is going through. When brew finishes updating syncthing, syncthing-macos loses its exclamation point and things continue running as they were before.

** Update 11-2-2022 **
Still running Monterey and the procedure above worked well to upgrade from syncthing 1.20.4 to 1.22.1.

SSD Fix

My macbookpro11,4 has been rocking a 3rd party SSD since I picked it up and the last couple weeks I’ve started biking to work. The weather is still cold here and suddenly my Mac was exhibiting kernel panics, argh:

panic(cpu 0 caller 0xffffff801a5597c6): nvme: "3rd party NVMe controller. PCI link down. Write. fBuiltIn=1 MODEL=ADATA SX8200PNP FW=32B3T8EA CSTS=0xffffffff US[1]=0x0 US[0]=0x2 VID=0xffff DID=0xffff CRITICAL_WARNING=0x0.\n" @IONVMeController.cpp:6053
Panicked task 0xffffff90357de670: 178 threads: pid 0: kernel_task

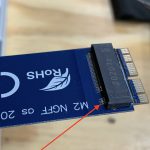
Growing slightly panicked myself, I figured that maybe the temperature changes had exacerbated the cheesy contacts on the 3rd party NVMe adapter I use. To fix, open your Mac, remove the NVMe adapter, gently rub the contacts on both sides of the adapter with a high polymer eraser (one of those white ones, I used a Pentel UPC 072512027660), and then re-insert the adapter with your NVMe SSD in your Mac. After rubbing/erasing the contacts the kernel panics disappeared.

** Update 5-28-2022 **
The panics returned, so I opened the macbookpro11,4 up and pulled the NVMe adapter out. This time I used a 10x loupe on it and discovered several of the pins are not attached to the board, this is bad quality control. Even better, I pulled out another adapter that failed a couple years ago and found a similar issue where only one pin had broken away from the board. Seeing that the old board was an easier repair, I pulled out my trusty soldering gun and reconnected the lone broken line. I put the ADATA NVMe back in my macbookpro11,4 with the older NVMe adapter and every is great, I’m writing this post right now with the old NVMe adapter.

Time to head to Amazon to process a warranty claim on the newer NVMe adapter and it’s failed connection points:

** Update 9-27-2022 **
The panics stayed away today when they returned. I pulled the NVMe adapter out and I didn’t bother to look at the solder points this time, but the temperature has started to drop around here and I’ve been going to work 3 times a week. I decided to clean the pads on the NVMe adapter with a fiberglass pen, which worked well on Tina’s laptop yesterday. Will report back, but the machine is already booted back up to write this and the entire thing feels faster and so far: no panics.

** Update 11-29-2022 **
So, the drive died again. And now I see what’s going on. The SSD is attached to a cheap Sintech adapter that has pins that keep popping off the adapter’s PCB. When the pins intermittently make a connection, it erratically disconnects power from the poor SSD and has now made it inaccessible, AGAIN! Worse, my Time Machine backups stopped while I was out of town, so my nearest backup is from 11-23-2022, which should be pretty good. Before I try recovering from a backup, I need to resolder the darn Sintech pins (should I trust the adapter any more?!) and then try to read the data after I execute a power-cycle method on the SSD. Last time I tried the power-cycle method I lost my data, but the drive was fixed and readable again so I never sent it back to ADATA for an RMA replacement. I’m in the middle of the power-cycle right now. I’ll post pictures later, but based on this pin-out guide and description I taped over all of the SSD’s pins except for pins 1-4, then I put the adapter gently into a USB enclosure and connected it to my MacBook Pro with a USB cable to power it up. Interestingly, during the first 7 minutes the light on the external USB enclosure illuminated and did not flash. After 7 minutes, the light started to flash. Presumably the flashing means the power-cycle method has been initiated and it is now erasing the SSD’s cache as the best response in this thread indicates. I still have it unplug it for 30 seconds and then power it another 30 minutes. More soon…

** Update 12-19-2022 **
A couple weeks ago I sent my ADATA NVMe back for a warranty swap and needed a place to store my data, so I picked up a Samsung 970 EVO Plus. Kernel panics and sudden restarts continued with the 970, what gives?! I’m reading here that TRIM issues can lengthen restarts, but what about panics? Also, tonymacx86 recommends these NVMe drives on Hackintoshes, maybe I should check out a Western Digital NVMe? Finally, I’m actually excited to Ventura, because if I can revive my macbookpro11,4 it means I’ll have to use OpenCore Legacy Patcher and will have access to the SetApfsTrimTimeout patch described here. Also, the 970 makes this Hall of Fame list with the caveat that TRIM is disabled.

** Update 12-20-2022 **
Still working on this and now I think I’ve figured it out. The macbookpro11,4 runs flawlessly when it is in its dock at home and attached to a pair of Thunderbolt displays, but the minute I yank it out, put it to sleep, and try to go mobile the macbookpro11,4 starts to randomly restart. Being plugged into Thunderbolt Display ports helps to mask this issue and it is indeed a board level repair to correct the issue as described here https://www.youtube.com/watch?v=_QC_KcnPQmE. I ordered up 4 replacement MOSFETs, FDMF3030 variety, from DigiKey and others should work too. I received a brand new hot air workstation today. I’m probably stupid foolish to make this my first hot air workstation repair, but I’ll probably give it a go after I practice on other boards. Wish me luck! I don’t have one of the recommended ultrasonic cleaners (Crest PH1200 or P500h45), so I’ll just clean the board/work area with plenty of alcohol. To test the old FDMF6808 mosfet chips after they are removed, use the testing procedure here after they are removed. These folks also describe and show pictures of the MOSFET repair. Also, the MOSFET repair is discussed here.

** Update 12-21-2022 **
I woke up in the morning to find the macbookpro11,4 dead, not responsive to anything except the charger light goes green when it is plugged in. The FDMF3030 chips have yet to arrive, but my hot air workstation did. I may begin practicing on the now dead board by removing the old FDMF chips and try reflowing them. And I may remove the old FDMF chips and test them. Even if the existing FDMF chips aren’t bad I have better chips coming. With my non-existent hot air workstation skills I may be destined for a fail with this repair, but at this point I have nothing to lose.

Before repairing the board, I need to read up on the optimal temp and flow rate and remove the heat sink so I don’t cook the CPU, which may already be fried. Darn, I wished I’d ordered the FDMF3030 chips earlier and repaired the board before things worsened, but it took me a while to figure all of this out.

** Update 12-28-2022 **
I picked up a macbookpro11,5 from a local auction. I’ve got it up and running, but now I’m seeing the same issue. The machine randomly reboots when it is running on battery and at a low CPU state. I may put the FDMF3030 chips to use yet. More later.

** Update 10-1-2023 **
Sorry for my lack of updates, it’s been nearly a year and busy… Brief update, the macbookpro11,5 I purchased is working flawlessly today. The reason why the NVMe kernel panics were happening was the NVMe adapter card was cracked. I had tried to resolder its leads, but that wasn’t the actual problem. The problem was the adapter’s plastic housing that the NVMe slides into, this plastic housing had cracked and allowed the leads to occasionally disconnect. After I bought a new NVMe adapter card, it came with an adhesive pad that is placed over the top of the adapter once it is inserted into your Mac. The pad supports the adapter plastic by pushing off the bottom case of your Mac. Since installing the new card, no more adapters – yes!!! It’s frustrating we need the pad though, why not just make the plastic on the NVMe adapter a bit thicker and stronger?

** Update 7-12-2024 **
My macbookpro11,5 that I purchased from k-bid.com is now freezing every few days while running on Sonoma. I think it is likely the FDMF issue and I still have the FMDF3030 chips – when I work up the nerve I’ll do the swap. Until then, I’m using the

VirtualBox and virtual machine startup error

I added a Mojave virtual machine to VirtualBox on my Mac running Monterey, but suddenly neither of my virtual machines would launch, each spewed a message like this:

virtualbox Kernel driver not installed (rc=-1908) Make sure the kernel module has been loaded successfully. where: suplibOsInit what: 3 VERR_VM_DRIVER_NOT_INSTALLED (-1908) - The support driver is not installed. On linux, open returned ENOENT.

and

Error Domain=KMErrorDomain Code=27 "Extension with identifiers org.virtualbox.kext.VBoxDrv,org.virtualbox.kext.VBoxNetAdp,org.virtualbox.kext.VBoxNetFlt,org.virtualbox.kext.VBoxUSB not approved to load. Please approve using System Preferences." UserInfo={NSLocalizedDescription=Extension with identifiers org.virtualbox.kext.VBoxDrv,org.virtualbox.kext.VBoxNetAdp,org.virtualbox.kext.VBoxNetFlt,org.virtualbox.kext.VBoxUSB not approved to load. Please approve using System Preferences.}

Then I finally realized what the problem was. I had recently disabled SIP. To fix the issues above, I had to re-enable SIP following these steps:

1. Reboot Mac in recovery mode, hold command and R when restarting your Mac.
2. In recovery mode, open Terminal.app and execute the command “csrutil enable”.
3. Restart your Mac and log in as usual.
4. Launch VirtualBox and then open System Preferences->Security and allow access to Oracle. You may have to reboot one more time after doing this.

Before figuring this out, I had also uninstalled and reinstalled VirtualBox, but I’m not convinced that is completely necessary.

Panama City: Transit, Wireless Data, and Canal Info

We had a wonderful week in Panamá, including Panama City and Bocas del Toro/Bastimentos Island. I just wanted to spew some info and links here for others who may be visiting and want to know how to get around by bus/rail from PTY and how to get wireless data service going using a local carrier on an eSim.

Transit
After landing at PTY, get yourself a Bus Card and charge it with a few dollars to get around for your trip. At PTY’s baggage claim area and to the left of the doors to go outside, you’ll see at least one staffed booth. I approached it and a woman inside selling SIM cards offered to sell me a Bus Card. It was $5 for the card, which includes $3 of value already on the card and you’re spending $2 to obtain the card. I tried asking her for a RapiPass, but she didn’t seem to know what I was talking about, most likely my muy mal español. After I bought the card for $5, I told her I wanted to put another couple bucks on it, so she walked me to a red automated kiosk adjoining her booth and helped me put another couple billete on the Bus Card.

From the Terminal, I had planned to walk us 3 blocks to catch an S480, which would have taken us all the way downtown without transfers, but it was pouring rain. Instead, we walked across the first two lanes of traffic and started walking to the left down the pedestrian sidewalk and the buses. At this point, we had several cab drivers following us trying to pitch their services, but I love mass transit and refused. Sadly, it had been a long flight and before I could get us on a different bus that left from the covered/dry area attached to the airport my lovely bride had reached her end and desired a cab. We overpaid $30 including tip to go to the old town, but it was probably worth it.

I wanted to catch a Diablo Rojo while we were there, and I can report they are still operating as of this post, but we never rode one – came so close though! None of them seem to be labeled and I don’t know their routes, so we opted to stick with official buses and trains (Linea 1 y 2) as we were packing a lot into a couple days in Panama City.

Riding the bus… For getting a smaller local bus or a Diablo Rojo, you may need to wave them down. For most of the bigger Metro buses, they seem to just stop if you’re at a marked bus stop, but you can even wave them down if they’re in a slow area (we did this once coming back from Panama Canal). We used one Bus Card card for the 4 of us – as we boarded the bus, the first person touches the card to the yellow scanner body, pushes through the turnstile, and hands the card back to the next rider. For getting off the bus, you just need to scan the card once and then we each walked through the turnstile. For riding the trains, entrance is the same as buses, but to leave a train station you each must scan once and hand it off to the person behind you, we moved to a quieter turnstile and found hand-offs easy.

For getting to Panama Canal, it was pouring and we got on the wrong bus. Fortunately, a lovely local Panamanian woman noticed our error, took us off the wrong bus, and walked us to Estacion Cinco de Mayo – we thanked her before she walked off in the pouring rain to probably catch the next bus. She was so kind and this should help you understand how warm and welcoming Panamanians are. Once again, thank you rojo-hooded señora!

After she guided us to Cinco de Mayo Estacion, we took Linea 1 to Albrook. At Albrook station, we scanned our Bus Card to exit and walked up to the bridge to walk over the buses to the transit terminal. From the transit terminal, we picked up a RapiPass card, because I incorrectly assumed we needed one – note, RapiPass cards have the advantage of working on buses, trains, and turnstiles inside the Albrook Bus Terminal for accessing long range buses, but for accessing local buses you do not need the RapiPass.

Upon reaching the ground-level floor at the Albrook bus terminal, we walked to the far right and out to the doors to the left to board C810 on our way to Panama Canal. This is a local bus and you can board for a $0.25 tarifa using either a Bus Card or a RapiPass. For getting to Albrook Airport a day later, we took C820 from Albrook Mall/Transit Hub, which is the bus directly in front of the C810. The C820 doesn’t stop right at Albrook Airport, but it’s only a 4-block walk.

We always recharged our Bus Card and RapiPass at Albrook or PTY at standalone automated kiosks, but there’s suppose to be ways to recharge via the web and here, but we never got this to work – I got as far as entering how much I wanted put on the Bus Card and entered my credit card info, but the website always reported incorrect “BIN”. Maybe I should’ve tried a debit card instead of a credit card?

For useful apps, I trialed PTYCards for free for a week and found it the most useful for checking card balances and uses; it can look up values for RapiPass and Bus Cards. If you want a similar app with no trials, get Saldo Panamá which does the same thing but seems to time-out once in a while for me. For finding bus times and routes, I relied on Google Maps (transit option) and Moovit. I also had MiBus Maps Panamá, but found myself not using it while we were there. Finally, I also tried Metro Panamá, but found it to be the least useful; it offers info about stations, but it was unable to top-up any of my cards despite bragging this as a feature and it has a button for directions that only redirects to Google Maps.

Wireless Data

I kept my existing Total Wireless (now “Total By Verizon”) SIM installed inside my iPhone XS Max and added a prepaid data-only local eSIM through Airalo. Airalo offers several options, a country-specific local eSIM (what I selected), a region-specific eSIM (might be useful for folks on a cruise visiting a few nearby countries), and a global eSIM; these eSIMs increase in price. A Panamá-specific 3GB eSIM that is good for up to 30 days cost me $18. I bought the eSIM within the app and installed it before we left – it doesn’t actually activate until you start using data in the country it is activated for. The Panamá-specific eSIM allowed tethering by sharing its wireless data to my laptop and to my kids iOS devices.

Upon arriving in Panamá, the local eSIM didn’t seem to immediately pass data and I got concerned. Then I went into the SIM settings and enabled “Roaming” and data started working. While in Panamá, the eSIM mostly offered access through the provider Tigo, but on occasion I found it connected to Movistar. Tigo connectivity was good through most of Panama City; however, it only mustered a couple bars in the airplane at PTY, several miles south of the city. Later on the trip, we flew to Panamá’s gulf side to visit Bocas del Toro where Tigo’s connectivity was also good, but it was lacking soon after arriving at Red Frog on Bastimentos Island – note, Bastimentos is well off the beaten track lacking infrastructure like city streets. If I ever make it back to Red Frog/Bastimentos, I might try to improve connectivity by going into my phone’s SIM card settings and change the carrier from automatic to choosing a specific carrier – I didn’t bother to attempt this change until we were back in PTY and on our way home. On our Panamá-specific local eSIM plan, we only used 2 GB over an 8 day trip. Even if we had exceeded our 3GB cap, Airalo offers top-up packages through the Airalo iOS app. Overall, I think you’ll be happy with Airalo and I plan to look it up for our next international venture. Oh, and if you want to price shop for a low-cost eSIM for a specific country, I found the iOS app eSIMs to be useful. DENT Wireless seems to have even better pricing, but Airalo’s excellent integration made it worth an extra $5 for me.

Canal Info

Related to finding Panamax ships moving through the Panamá Canal download MarineTraffic. And as mentioned above, take the C810 bus from Albrook, it brings you right to the steps leading up to the Panama Canal’s visitor center at the Miraflores lock.

DeltaWifi.com and Gogo update

It’s been a few years since I first wrote about passing an hour of free TMO Gogo inflight to a Mac. We are on our way from Panama City to LAX (7 hour flight) and boarded an old Boeing 757-200ER that still rocks the old Gogo internet – woohoo! If you’re on a Delta jet with the new Ku wireless system, the instructions below likely do not work for you.

1. Open/switch to Safari and verify the “Develop” menu is present, between Bookmarks and Window menu options, in the menu bar at the top of your screen. If not, enable it with these instructions – and for those who cached my page before going taking flight, go to the menu bar and choose Safari->Preferences, click the Advanced tab, and check the box for “Show Develop menu in menu bar” – these instructions still work in macOS Monterey.
2. From Safari’s Debug menu open a new browser window/tab, preferably in incognito mode (command shift N), and choose Develop->User Agent->”Safari – iOS 14.0 – iPhone” (iOS version number doesn’t matter).
3. Go to the airport menu in the menubar on your Mac and join “DeltaWiFi.com”.
4. A new Safari window will probably pop up on it’s own, quickly go to Develop->User Agent and make sure there’s a check mark next to “Safari – iOS 14.0 – iPhone” or similar and, if not checked, select it to re-select it.
5. On the DeltaWiFi.com page that loads, you should be able to scroll down to see the pink TMO option. If the graphics and text are too large, command and “-” to make it fit in your window better. If you don’t see the TMO pink banner, try opening a new window/tab in incognito mode and make sure you completed step 3:

6. Enter a TMO phone number. Each time you request a free hour it must be the first time you tried with a specific TMO phone number for that flight.

7. You should now be online if you have a green bar near the top like the screenshot, below.

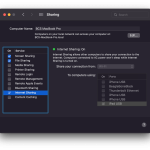
Bonus: the MacBook Pro/Gogo wifi internet connection can be shared to a tethered iOS device. For whatever reason, Bluetooth PAN is broken on my Mac running Monterey, but connecting an iPad to a Mac with a USB cable and setting the mac’s System Preferences…->Sharing window gives the iPad internet access:

Sharing_iPad_USB

Double Bonus: spoof-mac, as described here (or you could also try macchanger), allows more than an hour on the same Mac (if you have multiple active/valid TMO lines). While installing spoof-mac, my Mac was stuck on “brew update –preinstall” for a few minutes and spent another 20 minutes(!) downloading files, so make sure you install spoof-mac well before your first free hour is about to end – and if you don’t get spoof-mac installed in time, there’s one more item you can try near the end of this post.

My mac’s MAC address went from c4:b3:01:bb:0f:09 to 00:05:69:4D:C6:48; however, when I tried this, instead of seeing the green bar as in step 7, a red bar popped up saying that only one device is allowed per number per day. This was odd and we figured browser cookies were also behind this nonsense, so we brought up a new tab in incognito mode and this allowed another hour on the same Mac.

Here are the Terminal.app commands we used to install spoof-mac with brew (takes over 20 minutes on Gogo) and then spoof your mac’s AirPort MAC to get another free hour.

1. Open Terminal.app on your Mac and enter the following commands one at a time:
brew install spoof-mac
2. Go into System Preferences…->Network->AirPort->Advanced… and select the Hardware tab. At the “Configure” contextual menu, change from Automatically to Manually. Click OK, then Apply, and close out of the Network preference pane.
3. Return to Terminal.app on your Mac and enter the following commands one at a time:
spoof-mac list
sudo /System/Library/PrivateFrameworks/Apple80211.framework/Versions/Current/Resources/airport -z
sudo spoof-mac randomize en0
spoof-mac list

3. The last command in the above step is optional if you want to see what your new MAC address is.
4. Return to step 2 near the top of this blog post to request another hour of Gogo through TMO.

Alternatively, if you were unable to install spoof-mac it may be possible to spoof your AirPort card’s MAC address at en0 by executing the following Terminal.app command:

sudo ifconfig en0 lladdr 00:bb:cc:dd:ee:ff

(change “00:bb:cc:dd:ee:ff” to whatever you want your MAC address to be)

Open Core Legacy Patch and macbook6,1

I decided to bring an old MacBook back to life by installing an extra 1TB SSD and macOS Monterey. Aside from needing to erase and format the SSD with another Mac (the MacBook couldn’t seem to do it from the Monterey installer). Anyway, the process was easy enough with Open Core Legacy Patcher. I may end up helping others do this and figured I’d leave myself and others a cheatsheet:

Everything went fine and I’d definitely try this on another machine if the opportunity arises. Our macbook6,1 only has 8 GB of RAM and so far things seem to be running fine.

Adata XPG SX8200 Pro, Samsung 970 Evo Plus, and Sintech

In early September 2021, I popped a brand new 2TB Adata XPG SX8200 Pro into a Sintech adapter and the pair into my mid 2015 15-inch MacBook Pro (MacBookPro11,4). The tandem worked beautifully until February 25 when the Adata drive’s GUID partition became so corrupted that the drive wasn’t viewable to macOS or readable at all. Fortunately my Time Capsule had a backup less than 8 hours old.

In an interesting twist, I used the power-cycle method on the Adata SSD and was able to get it working again. My data couldn’t be recovered from the Adata SSD, but I was able to erase and re-format it as an APFS drive again. Even though Adata provided an RMA under warranty if I want to send it in, I flashed my data back to it and am using the Adata drive as-is in the Sintech adapter again. I will follow up with Adata to see if they still want to see this drive as something caused it to fail; it may be the drive is failing, the Sintech adapter is dying, or maybe even the MacBook Pro sent some unkind juice?

While the Adata SSD was briefly out of action, I popped a Samsung 970 Evo Plus 2TB into the Sintech adapter. The Samsung SSD seemed to work for about 12 hours, but the next morning the MacBook Pro was booting to the desktop and then automatically restarting on its own. The Samsung SSD was manufactured September 2021 and I tried to patch it with Samsung’s latest firmware “Samsung_SSD_970_EVO_Plus_4B2QEXM7.iso”, but this file said the Samsung’s SSD was already current. Despite this ad saying that the Samsung 970 Evo Plus 2TB is compatible if running the current firmware, I didn’t find this to be true. I also tried the Samsung SSD with another Sintech adapter I have (the stubby one for MacBook Air devices), but it didn’t work. After all this happened, I decided to return the Samsung SSD as I seemed to have the Adata device back up and running again.

Below are Blackmagic numbers with the Adata drive and this Sintech adapter. I’m pleased with the pair when they keep my data intact:

Windows and Re-connecting to Network Drives

Sometimes my work machine running Windows 10 loses it’s VPN connection, but when the VPN connection is re-established I’m finding the network drives no longer want to connect.

Click the Start button, then type in “cmd” and enter to bring up a command prompt. Then insert the following text:

net use p:

Which then spews out the following if you’re lucky:

Local name p:
Remote name \\yourcompanydomainname.com\projects
Resource type Disk
The command completed successfully.

After returning to navigate folders in Windows indeed the network file paths are working again – woohoo! I think in the old days Windows I occasionally had to re-run a .bat script to re-establish network file path connectivity, but this seems to be a bit easier.