About Brad

All-around tough guy.

system/com.apple.screensharing fix

After installing OpenCore Legacy Patcher on my Mac mini, it has been flawlessly running Monterey for several months, with the exception that screensharing stops randomly. To get around this, I’ve been making an ssh connection to the Mac mini and then run this command:

sudo launchctl kill KILL system/com.apple.screensharing

Rather than having to run this command manually, automate it with launchctl to run as a LaunchDaemon every day at 2 am:

  1. Touch a .plist file in the following directory using this command in Terminal:
    sudo touch /Library/LaunchDaemons/com.screensharing.restart.plist
  2. Edit the .plist file by executing this command in Terminal:sudo pico com.screensharing.restart.plist
  3. Copy text from this file and paste it into your .plist file.
  4. Save your .plist file by pressing the “control” and “x” keys and choose press “y” and “return”.
  5. Load the .plist into launchctl using the following command in Terminal.app:
    sudo launchctl load /Library/LaunchDaemons/com.screensharing.restart.plist
  6. If the LaunchDaemon loaded, it should appear in the list produced by this Terminal command:
    sudo launchctl list
  7. To unload the LaunchDaemon we created above, execute the following command in Terminal:
    launchctl unload /Library/LaunchDaemons/com.screensharing.restart.plist
  8. Finally, if you wish to completely remove this command from your machine, delete the .plist file with this command:
    sudo rm /Library/LaunchDaemons/com.screensharing.restart.plist

Worth noting, this LaunchDaemon executes as the “_www” user, so it should run whenever the Mac mini has booted Monterey. Will keep you posted how this works and if I need to increase the frequency. Ultimately, I’d like to find out what is causing the screensharing crash, but that may be above my abilities.

Snow Deer versus Fieldsheer

When I bike (or do just about anything else) outside during winter time my fingertips annoyingly and temporarily lose circulation. Chemical packs help when the temperature goes below zero degrees F, but I don’t always remember to keep them with me and they don’t do much for my thumb. My last bike commuter buddy, Rutager, told me he enjoyed using Snow Deer heated gloves for Nordic skiing last winter. My second-to-last commuter buddy, my Dad, saw Fieldsheer’s Mobile Warming Squall Heated Gloves (MWUG29010622) at Costco and picked up a couple pairs, XL and XXL, for me to try out. I decided to pit the two manufacturer’s gloves against each other in a face-off for future time with my hands, here’s what I found out.

Before we get started, I gave the Fieldsheer an initial fit-test by trying them on for size. The back of the packaging recommended XL gloves should fit me; however, XL gloves were too tight so I returned them and kept the XXL for the test. Fieldsheer XXL versus Snow Deer XXL is the challenge!

The gloves are somewhat similar in appearance, both black with a heater control button on the backside offering 4 levels of heat: high, medium, low, and off. The Fieldsheer gloves are a bit longer, offering more wrist coverage. With batteries, a pair of XXL Snow Deer weigh in at 427 grams and the Fieldsheer XXL come in at 461 grams. Not a big difference.

I tested each pair for heat output and didn’t notice much of a difference based on touch, they seem to heat up at a similar rate and provide a similar maximum temperature. I didn’t measure the heating rate or absolute temperature with instruments, but the difference appears insignificant. Unlike the Snow Deer gloves the Fieldsheer offer 60-gram 3M Thinsulate – I didn’t test outdoors, but it’s possible the Fieldsheer’s insulation will retain temperature better outside.

Appearance is nearly identical; however, the Snow Deer show off a bright red LED that is really bright. The Fieldsheer isn’t as bright offering lower profile light for daily use, but does have a physically higher-profile button that may get in the way more often than the Snow Deer’s button. Since I haven’t used either glove outside yet, I can’t say whether any of these features is a hindrance or help.

The Snow Deer XXL fit on my hands may be close to perfect, whereas the Fieldsheer XXL were not as snug and seemed to not want to bend with my fingers as easy as the Snow Deer. The winner for soft touch inside the glove is the Snow Deer and Tina agreed. I give the edge to Snow Deer on fit.

Glove function (i.e., taking the gloves on and off and using the heater control button) is something I expect to be important going forward. First, the index fingers on both gloves interact with the replaced screen on my iPhone XS Max – I don’t need to type full emails with the gloves on, but being able to swipe and read a text message makes these gloves useful. For removing my hands from the gloves (something I do more often than I should in the winter time while riding) the Snow Deer seemed to behave more as a cohesive single glove, whereas the Fieldsheer’s liner seemed to want to separate from the outer shell. Liner-from-shell separation may be a design advantage for folks who want to turn theirs inside out for post-ride drying; however, with a heat supply inside the glove I don’t expect these to get wet and I prefer the ease of taking the gloves on and off at-will. While the Fieldsheer gloves have status indicators directly on the batteries, the reality is that the on-battery indicator is not visible while it is tucked into the glove’s zippered pocket. I give a slight edge to the Snow Deer gloves on function.

On cost, I used eBay to score the Snow Deer gloves at half the price of the Fieldsheer gloves from Costco. It’s not fair to give an advantage to Snow Deer here, as I didn’t even look to see if there were deals on Fieldsheer heated gloves. If buying new from a reputable distributor, the cost of the gloves is comparable.

Warranty: each manufacturer offers a 1-year warranty, push!

Wall charger: the Snow Deer gloves come with USB cables and a power adapter to charge the 7.4-volt batteries; the USB cable has an inline buck converter that takes charging voltage from the 5-volt power adapter up to 8.6 volts. The Fieldsheer came with USB cables that can be plugged into a 5-volt power adapter, but no adapter. Slight edge to Snow Deer for providing a power adapter.

Batteries: the Snow Deer offer a 2200 mAh battery to each glove that put out 7.4 volts and charge at 8.6 volts, whereas the Fieldsheer have 4700 mAh batteries that put out 3.7 volts and charge at 5 volts – these batteries have roughly the same total output. I’m giving an advantage to the Fieldsheer batteries, because I rock Exposure lights on my bike that charge at the same voltage, which means I could possibly use the same charger for my lights and gloves.

Minor annoyance: the Fieldsheer glove packaging has QR codes that, when scanned, bring me to a server that is unavailable.

In the end, I chose the Snow Deer XXL gloves and will return the Fieldsheer XXL gloves to Costco. I am not completely ruling out the Fieldsheer gloves though and the points above may bring me back. Also, Fieldsheer offers a plethora of other products on their website, including heated soles, so I may be back to take care of toes like my now lucky fingers.

LIFX BR30 Repair

Liam has a pair of LIFX BR30 bulbs in his room. The bulbs are several years old, off warranty, and the south bulb recently shifted to a blue hue for all light modes. I don’t like throwing this stuff away and no one else seemed to talk about how to fix it, so I decided to make a couple repair guides on iFixit, one involves resoldering a pair of resistors on the BR30’s white PCB.

The BR30 light is back in service and the blue hue shift is gone, Liam is happy, and one more broken item is out of my shop – woohoo!

2001 New Beetle and M-Link V-1 B Repair

Years ago my dad installed an M-Link V-1 B in my mom’s 2001 New Beetle. Oddly, the V-1 B isn’t even recommended for this model of vehicle, but I’ll let that go for now. The information I’m passing on today is a fix for when your iPod connector breaks from the M-Link cable.

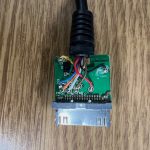
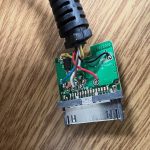
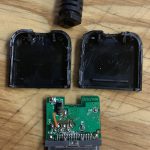
The M-Link’s iPod connector end is easy to take apart and once inside I found this:

I couldn’t tell which wire went where; however, M-Link provided these photos that helped me fix my adapter:


After M-Link sent pictures, I used this site to draft up a wire and pin number table for those who care. I’ll format this table later, but wanted to post it now to help folks sooner:

Wire color       Pin number	Apple Pin	Function
black 29,30 1,2 FireWire Ground, –
red 21 10 Accessory indicator/serial enable
white 4 27 Audio output, left channel, +
orange 3 28 Audio output, right channel, +
yellow 19,20 11,12 +12 volt, FireWire Power
green 13 18 iPod receiving line, serial RxD
blue 2 29,30 Audio ground, –
brown 12 19 iPod sending line, serial TxD

* Numbers printed on M-Link V-1 B PCB refer to Apple Pins

Also, I was able to resolver the broken cable and my M-Link V-1 B is working again.

2001 New Beetle and Oxygen Sensor

Last week I tried pulling the O2 sensor off my New Beetle and I nearly sheared the damn sensor off, and bungled one of the points on the sensor in the process. I regrouped and bought a couple sockets off of Amazon, but they didn’t even fit on. In the end, here’s what worked:

1. Using MAPP gas heat the bung, the female threads holding the oxygen sensor in place, for 70 seconds.
2. Clip the wire off the old sensor and place a 12-point 7/8-inch box-end wrench over the sensor and pull.

That’s it. The sensor required some strength to break it free, but then it came out pretty easy. I was tempted to spin it with my fingers, but be careful as it will retain heat for a good ten minutes after heat was last applied. To reinstall the new sensor (I bought a cheap one on eBay marked 050558 000025-050558 613234-21-05 and Made In China):

1. Apply anti-seize lubricant (Permatex 133A – 81343) to the oxygen sensor’s threads.
2. Apply AGS dielectric silicone compound to the electrical connections on the oxygen sensor and the car.
3. Thread the new sensor into place and snug up with a good tug on a 7/8-inch open-end wrench (I don’t have a torque wrench to apply 30 pounds with, so I estimated).

If this cheap sensor performs I’ll pick up another for front side of the catalytic converter.

** Update 10-16-2023 **
So the cheap sensor from eBay began failing on September 14, 2023, just inside its one-year warranty. The eBay seller tried to honor the warranty by getting me to send them $12 outside of eBay through their PayPal account. Sorry, not falling for that tomfoolery. Instead, I paid five times the price and bought a Walker 350-34377 locally from Autozone that also comes with a one-year warranty. I installed the Walker oxygen sensor early in the morning 10-17-2023, let’s see how long this one lasts! The threads received a some anti-seize grease before I threaded it on and tightened it up with a box wrench.

I also ran some diagnostics with the OBDII reader and the bank 1 sensor 1 seems to oscillate up and down voltages after it has warmed up. The new bank 1 sensor 2 was constant at about 0.45 volts, but I probably didn’t let it warm up long enough to see if it would be constant at a higher voltage at cruising temperature. Next time I go on a longer trip I will re-monitor its voltage.

A1296 mouse repair

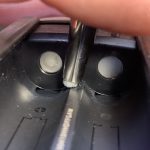
My Apple Magic Mouse A1296 was suddenly turning off whenever I moved it around or bumped it. I pulled the batteries out and noticed some battery acid deposits on the positive terminal of the mouse. Easy fix, once again my fiberglass pen to the rescue, in the picture below see the battery acid on the left terminal and the cleaned terminal on the right side:

A1296 with dirty positive terminal on left and cleaned positive terminal on right.


Since cleaning the terminals the Magic Mouse is once again working flawlessly.

** Update 11-16-2022 **

Oddly, it worked fine for a while, but now it’s becoming unusable again. I may attempt this hack, but it hardly seems worth it:

https://www.instructables.com/Magic-Mouse-A1296-14500-Rechargeable-37v-Li-ion-Co/

Others suggest make a small paper airplane and wedging between the batteries, sometimes with tinfoil at the battery leads to tighten up tolerances. I tried the paper airplane route, will report back…

Park Tool PFP-3 Fix

I’m not really sure how this happened to my Park Tool PFP-3, but somehow I misplaced the rubber gasket that goes between the pump shaft and the base (or maybe it fell off when I was taking it apart). No big deal, I’ve got a handful of extra rubber hose washers for my garden hose and I was able to stretch one around the pump’s shaft. The gaskets I used are TerraVerde Splash 91422 (UPC 715064914223), which seem to have some stretchiness to them.

Only one garden hose washer was needed for an excellent replacement o-ring. Park Tool shows some maintenance for the PFP-3 and watch my video for some of the repair in action.

US Bank and Returned Deposit Fee

Today I had the pleasure of working with US Bank’s, Justina, after my daughter recently incurred a returned deposit fee. Justina was excellent and forthright in explaining US Bank’s fee and that they will not verify a personal check before a customer attempts to deposit it. She said US Bank will verify cashier’s checks, but not personal checks. This is a note to self and others: stop accepting personal checks for payment from others unless you want to expose yourself to liability that includes your banker’s returned deposit fee.

Interestingly, deposits can also be returned if the personal check has incurred too much damage. I asked Justina what constitutes damage and she explained that damage to numbers on the check may warrant a returned deposit fee – if a deposited check rolls through US Bank’s teller machine and is unreadable, they can assess you a returned deposit fee.

I’m curious what else meets US Bank’s criteria for customers incurring a returned deposit fee. For instance, if the check’s paper has too much moisture and slips in the teller’s machine, what moisture to paper ratio warrants a returned deposit fee? Ha, this inquiry will wait for another day. In the mean time, don’t handle personal checks.

FTP download folder

Every once in a while I want to be able to download an entire folder from an FTP server. After setting the local download directory, with something like:

lcd /Users/brad/Desktop/Junk

I navigate to the directory on the FTP site containing all the files I wish to download and type:

prompt
# the command above allows the downloads to keep going without user intervention

and then
mget *.*
# mget with the above wildcard should download any file in the directory. There are any number of ways to limit it, for instance, if you only want .csv files use the following command:

mget *.csv